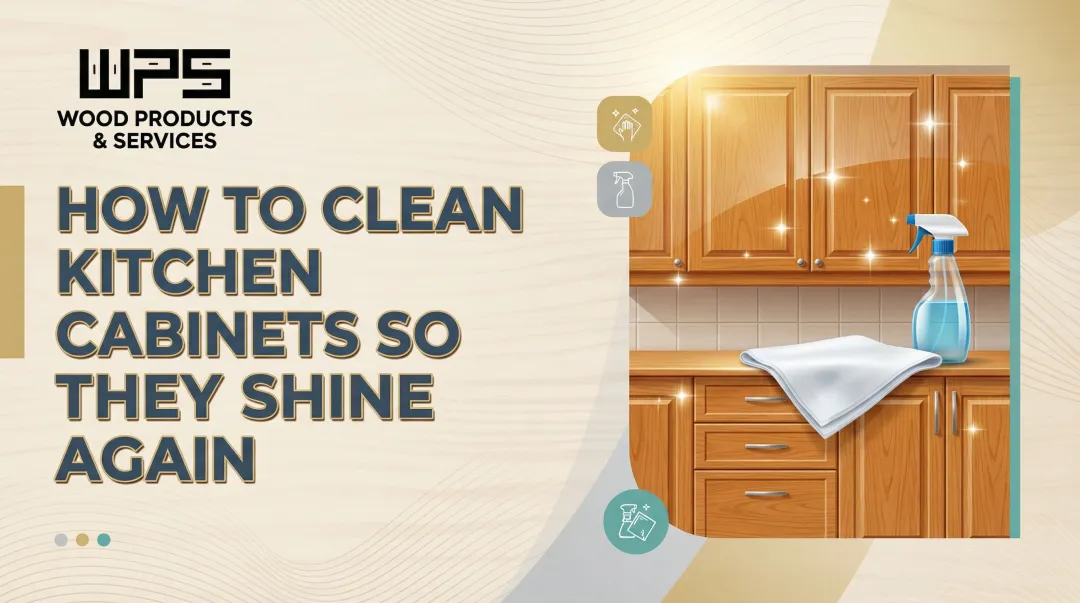
Introduction
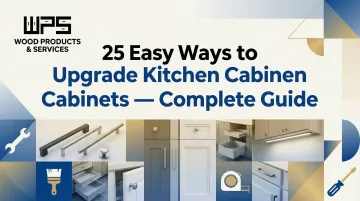
Many homeowners face the same frustration: outdated builder-grade kitchen cabinets that feel uninspiring — yet a full replacement can easily run $15,000 or more, with weeks of disruption. In most cases, upgrading what's already there delivers a dramatic result for a fraction of that cost.
This guide covers 25 upgrades organized from quick cosmetic fixes to professional-grade transformations, so you can choose what matches your budget and skill level. Some upgrades are weekend DIY projects costing under $50. Others deliver near-custom results. Start with the section that fits where you are right now.
TLDR: 25 Ways to Upgrade Kitchen Cabinets at a Glance
- Paint cabinets in trending warm tones or create two-tone color schemes for instant visual impact
- Swap hardware to modern finishes like brushed brass or matte black for an afternoon update
- Functional storage upgrades — pull-out shelves, drawer dividers, and toe-kick drawers — maximize every inch
- Install architectural details like crown molding or door-front trim to mimic custom cabinetry
- Professional refacing saves 50–70% over full replacement if your cabinet boxes are still structurally solid
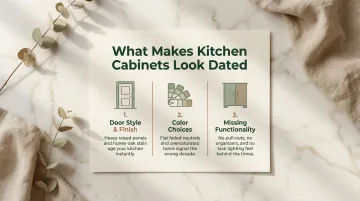
What Makes Kitchen Cabinets Look Dated?
The most common culprits are flat or fussy door styles from previous decades. Early 2000s raised-panel oak cabinets, yellow-toned wood stains, and tarnished hardware signal age at a glance. Heavy raised-panel doors with cathedral arches and glossy honey oak finishes from the 1990s feel the most out of place in modern kitchens.
The absence of intentional color makes cabinets blend into the wall rather than anchor the room. Everything the same flat shade—or a worn, uneven beige—creates visual monotony. Cool gray and greige paint colors that dominated the 2010s now feel generic rather than fresh.
Aesthetics aside, function dates a kitchen just as fast. Missing pull-outs, no interior organization, and absent under-cabinet lighting all read as neglect — even in otherwise decent-looking cabinets. These are also the easiest wins when planning an upgrade.
The three main areas that make cabinets look dated:
- Door style and finish — heavy raised panels, cathedral arches, and honey-oak stains
- Color choices — flat, faded neutrals or oversaturated tones that no longer match current tastes
- Missing functionality — no drawer organizers, pull-outs, or task lighting inside or underneath
Ways 1–10: Quick and Cosmetic Cabinet Upgrades
Way 1: Paint Your Cabinets a Fresh Color
Painting delivers the single highest-impact, lowest-cost cabinet upgrade available. The process requires careful prep: degreasing, sanding, priming with a bonding primer, and applying two thin coats of cabinet-grade enamel. Skipping prep is the number one reason painted cabinets chip and peel within a year.
DIY painting materials cost $200-$600, while professional painting runs $1,200-$7,000 depending on kitchen size.
Trending colors for 2026:
- Warm neutrals: Benjamin Moore's Silhouette AF-655 (rich espresso brown) and Sherwin-Williams' Universal Khaki SW 6150
- Earthy greens: Farrow & Ball's Sap Green and Yeabridge Green
- Deep jewel tones: Midnight navy, forest green, near-black
- Muddy pastels: Muted pinks, soft terracottas, warm olives
Colors falling out of fashion:
- All-white (now feels generic rather than fresh)
- Cool gray and greige
- Stark builder-grade beige
Way 2: Mismatch Upper and Lower Cabinet Colors
The two-tone approach breaks up monotonous kitchens without a full repaint. Nearly 24% of renovating homeowners adopt two-tone cabinets, typically using darker hues on lowers (navy, forest green, charcoal) paired with lighter neutrals or white on uppers.
This works especially well to add depth to an all-white kitchen. The contrast creates visual interest while keeping the space feeling open and airy.
Way 3: Add Color or Peel-and-Stick Wallpaper to Cabinet Interiors
Paint or paper the back interior wall of open or glass-front cabinets for unexpected color. Peel-and-stick wallpaper is the most forgiving option for DIYers and renters—no permanent commitment required.
Every time you open the cabinet, the detail lands like a quiet surprise. Choose bold patterns or saturated colors that would overwhelm larger surfaces.
Way 4: Swap Out Cabinet Hardware
Replacing knobs and pulls is the easiest upgrade on this list. It requires only a screwdriver and an afternoon. Hardware materials range from $2-$50 per piece, with total installed costs averaging around $300 for a standard kitchen.
Measure existing hole spacing before buying to avoid drilling new holes. Mix complementary hardware styles—same finish family, varied shapes—for a less formulaic look.
Trending finishes for 2026:
- Brushed brass and champagne gold
- Matte black
- Knurled textures that add grip and visual interest
- Mixed metals — deliberately mismatched rather than coordinated
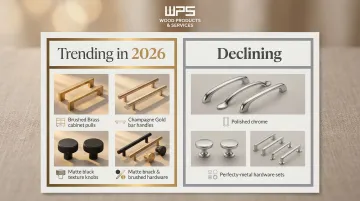
Declining finishes:
- Polished chrome (feels cold)
- Perfectly matched metals throughout
Way 5: Add Furniture Legs and Feet to Base Cabinets
Install decorative furniture feet in the toe-kick space of base cabinets to give builder-grade boxes a custom, furniture-like quality. Prefabricated legs are available at hardware stores and should be painted to match the cabinet finish.
The result reads as freestanding furniture rather than built-in boxes — a subtle shift that adds real character and visual weight.
Way 6: Dress Up Exposed Cabinet Ends with Decorative Trim
Apply the board-and-batten or lattice-trim technique to exposed cabinet sides. Attach a thin luan backer to create a flat surface, then nail strips of 1x3 trim in a panel pattern.
This costs around $30 per cabinet end and creates the appearance of custom millwork. It's especially effective on peninsula or island cabinets with visible end panels.
Way 7: Apply Beadboard to Cabinet Door Fronts or Sides
Adhere beadboard panels to flat-front cabinet doors to instantly add texture, depth, and cottage or farmhouse character. Apply a fresh coat of paint after installation to tie everything together.
The vertical lines create visual interest and break up large flat surfaces that can feel plain or builder-grade.
Way 8: Line Drawer Interiors with Removable Wallpaper
Use peel-and-stick paper on the drawer floor or visible side walls of open drawers. The effect is strongest in kitchens where drawers open frequently and guests are nearby.
Choose coordinating patterns or colors that tie into your overall kitchen palette. The detail feels intentional and custom without significant investment.
Way 9: Replace Door Fronts with Chicken Wire or Glass Inserts
Remove the door panel and staple wire mesh for a farmhouse look, or install glass inserts for a classic, open feel. Glass panel cabinet doors cost $30-$100 per square foot, significantly less than full cabinet replacement.
Both add visual depth and break up solid runs of cabinetry — glass inserts work particularly well flanking the stove or on uppers above prep areas.
Way 10: Install a Plant Shelf Above the Sink
Install a simple wood board between two upper cabinets above the sink to create a display ledge for trailing plants, adding life and softness to what's typically the hardest-surface zone in the kitchen.
Paint or stain the shelf to coordinate with the cabinet finish. The greenery creates a focal point and makes the kitchen feel more lived-in and welcoming.
Ways 11–18: Functional and Storage Upgrades
Way 11: Hang Storage Bars Inside Cabinet Doors
Mount small rods or rails on the interior of pantry and cabinet doors to hang spices, pot lids, or frequently used tools. This repurposes dead door space and keeps countertops clear without any structural work.
Adhesive or screw-mounted options are available at hardware stores for under $20 per door.
Way 12: Install Under-Cabinet Lighting
Under-cabinet lighting eliminates shadows during food prep and highlights countertop materials. DIY plug-in LED strip lights and adhesive puck lights cost $50–$300, requiring no electrician.
Position lights toward the front edge of the cabinet underside for maximum counter illumination. This small upgrade noticeably improves visibility during prep and adds a polished finish to the workspace.
Way 13: Add Pull-Out Sliding Shelves in Lower Cabinets
Roll-out shelves convert deep, hard-to-access base cabinets into fully usable storage. This feature is commonly found in custom kitchens but can be retrofitted into existing boxes with a screwdriver and drill.
Pull-out shelves make it easy to see and reach items at the back of cabinets, eliminating the need to crouch and dig.
Way 14: Use Adjustable Wooden Drawer Dividers
Wooden dividers—as opposed to plastic ones—give drawers a bespoke, high-end feel and can be customized to fit any drawer width. This upgrade makes kitchen tools easier to find and adds visual order every time a drawer is opened.
Bamboo and hardwood versions are widely available at kitchen supply stores, typically running $15–$40 per set.
Way 15: Install Peg Organizers in Drawers
Peg drawer systems hold plates, bowls, and cookware upright, making dishware storage more accessible and neatly arranged. This detail is commonly seen in designer and custom kitchens.
Adjustable pegs allow you to reconfigure storage as your needs change.
Way 16: Add Toe-Kick Drawers
The space beneath base cabinets (the toe kick) can be converted into slim pull-out drawers for flat items like cutting boards, baking sheets, and serving trays. This reclaims otherwise unused floor-level space without adding new cabinetry.
Toe-kick drawers are especially useful in small kitchens where every inch of storage counts.
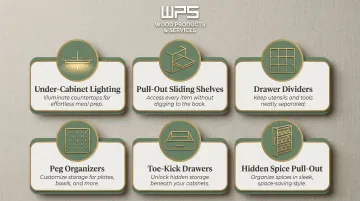
Way 17: Create a Hidden Spice Pull-Out
Use a narrow pull-out insert in the void between the stove and adjacent cabinetry, or within a filler cabinet strip, to create concealed spice storage. This looks intentional and maximizes every inch.
Spice pull-outs keep frequently used ingredients at your fingertips while maintaining a clean, uncluttered look.
Way 18: Add Undershelf Baskets and Wine Glass Holders
Clip-on wire undershelf baskets attach beneath upper cabinet shelves to store mugs, small plates, or pantry items. Under-cabinet wine glass racks hang stemware upside-down, freeing up shelf space while adding a wine-bar aesthetic.
Both options make use of previously wasted vertical space inside cabinets.
Ways 19–22: Structural and Architectural Upgrades
Way 19: Install Crown Molding Along the Cabinet Tops
Crown molding bridges the gap between cabinet tops and the ceiling, giving builder-grade boxes an architectural finish. Installation costs $4–$23 per linear foot, depending on material and detail.
Color-matching the molding to the cabinets creates a seamless, built-in look. Contrasting hues add drama and visual separation.
Way 20: Add Trim to Flat-Front Doors to Mimic Shaker or Panel Style
The process involves gluing and nailing slim molding strips onto flat-panel doors in a rectangular frame pattern to create the appearance of shaker or raised-panel cabinetry. Getting the proportions right matters — then follow through with seam filling, sanding, and paint to make the difference between a polished result and an obvious DIY addition.
Done well, this turns builder-grade slab doors into custom-looking cabinetry for under $50 per door in materials.
Way 21: Remove Upper Cabinet Doors for an Open Shelving Look
Remove hinged doors from select upper cabinets to open up the kitchen visually and create display space for curated glassware and dishware. Paint or paper the cabinet interior before doors come off.
This approach works best on two to four cabinets rather than the entire upper run. Too much open shelving can feel cluttered and require constant styling.
Way 22: Replace Solid Doors with Glass-Front Doors
Swapping solid wood or laminate cabinet doors for glass-insert versions adds depth and visual openness without fully committing to open shelving. This upgrade works best on cabinets flanking the stove or along a single accent wall.
Consider which option fits your lifestyle:
- Glass-front doors — forgiving of imperfect styling; easier to maintain than open shelves
- Open shelving — maximum visual impact; requires consistent, curated display
- Solid doors — most practical for everyday-use cabinets storing less decorative items
Glass-front doors break up solid runs and create visual interest while keeping contents protected.
Ways 23–25: Advanced Upgrades and Professional Options
Way 23: Reface Cabinets with New Veneer and Hardware
Cabinet refacing involves applying new veneer or laminate over existing cabinet frames while replacing all doors, drawer fronts, and hardware. This process costs 50-70% less than full cabinet replacement while delivering a nearly identical visual transformation.
Average refacing costs range from $4,000-$13,000, depending on kitchen size and material quality. The project takes 3-5 days and leaves the kitchen functional during the process, compared to 3-6 weeks for full replacement.
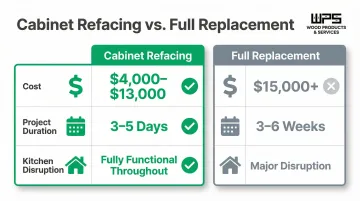
Refacing makes sense when existing cabinet boxes are structurally sound but the doors, finish, or layout feel dated.
Way 24: Install Paintable New Door Fronts Over Existing Frames
Purchase replacement door fronts from cabinet-specific suppliers and attach them over existing cabinet boxes as a middle-ground solution. Non-wood stock doors cost $30-$60 per square foot, while solid wood doors range from $50-$150 per square foot.
This option is more flexible than refacing, as fronts can be repainted or swapped again later without disturbing the cabinet structure. It's ideal when you want to update from raised-panel or arched doors to clean shaker or slab profiles.
Way 25: Invest in Custom Cabinetry for a Truly Tailored Kitchen
When existing cabinet boxes are warped, poorly laid out, or simply too damaged for surface upgrades to matter, custom cabinets are the most durable and highest-ROI option. They're precision-built to the exact dimensions of your kitchen.
That means built-in pull-outs, specialized storage, and configurations that off-the-shelf solutions can't replicate.
Quality Made Cabinets has been building precision-tailored kitchen cabinetry since 2010, backed by a 12-month workmanship guarantee and a free post-installation check. Their custom process includes free in-home consultations, 3D design previews, and installation using sustainably sourced materials.
Signs you've crossed from "upgrade" territory into "replace" territory:
- Cabinet boxes no longer close squarely
- Water-damaged frames or warped panels
- Layouts that don't match the household's workflow
- Lack of storage that no organizer can fix
- Structural instability or damaged joinery
Custom cabinets cost $500-$1,200 per linear foot, making them a significant investment. However, they deliver precision fit, durability, and features impossible to achieve with surface-level upgrades.
Frequently Asked Questions
Frequently Asked Questions
How much does it cost to upgrade kitchen cabinets?
Costs range from under $50 for hardware swaps to $1,000–$5,000+ for refacing or new fronts. Full custom cabinet installation varies widely based on kitchen size, materials, and features—typically $7,000–$20,000+.
Is $10,000 enough for a kitchen remodel?
$10,000 can cover a mid-range kitchen refresh—new cabinet paint, hardware, lighting, and basic fixtures—but may fall short for a full gut renovation in larger kitchens or high-cost areas. Focusing the budget on cabinet upgrades and leaving appliances and countertops intact stretches the spend further.
What time of year is the cheapest to remodel a kitchen?
Late fall and winter (November through February) tend to be slower seasons for contractors, often resulting in more competitive pricing and faster scheduling. Look for end-of-year material sales and check local contractor availability.
What makes kitchen cabinets look dated?
Heavy raised-panel oak doors with honey-toned stain, brass hardware from the 1990s, flat laminate finishes in beige or off-white, and a total absence of architectural detail or interior organization all read as dated. Cool gray paint and greige finishes that dominated the 2010s now feel generic.
What cabinet color is outdated?
All-white feels increasingly generic rather than fresh. Greige and cool gray have peaked as trending colors. Oak-stained finishes from the 1990s and 2000s read as dated, while earthy warm tones (terracotta, warm olive, deep sage) and deep jewel colors (midnight navy, forest green) are currently gaining favor.
What color kitchen is in for 2026?
Warm, nature-inspired tones dominate 2026 forecasts: terracotta, warm olive, deep sage, and muddy pastels. Moody darks like midnight navy, forest green, and near-black feel current and sophisticated. For the first time in a decade, wood-tone cabinets (29%) have surpassed white (28%) as the top choice in 2026 kitchen renovations.