Introduction
Kitchen cabinets work harder than almost any surface in your home. Every time you cook, they're hit with a mix of steam, airborne grease, fingerprints, and food splatter—especially the cabinets closest to your stove and around high-touch handles. Over time, that once-fresh finish becomes dull, sticky, and dingy.
Restoring that shine isn't as simple as a quick wipe-down. Sequence matters: you need to dust before you clean, choose the right solution for your cabinet material, then follow with a polish that actually holds. Skip a step or use the wrong product, and you risk dulling the surface further or even damaging the finish permanently.
This guide covers the supplies, the cleaning process, polishing technique, and what to do differently going forward to keep results lasting.
TL;DR
- Always dust before applying liquid cleaner to prevent smearing grime
- Wood, painted, and laminate cabinets each need different cleaning solutions
- Polish is a separate step that creates the shine—cleaning alone won't do it
- Never leave moisture on wood cabinets; dry immediately to prevent warping
- A weekly wipe and quarterly polish routine maintains results year-round
What You Need Before You Start Cleaning
Having everything ready before you begin keeps you moving efficiently from top to bottom without interruptions.
Essential Tools:
- Multiple microfiber cloths (at least 4-5)
- Soft-bristle toothbrush
- Spray bottle
- Vacuum with brush attachment
- Dry towels
Cleaning Solution Options:
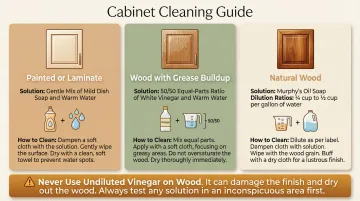
Your cabinet material dictates which solution to use:
- For light grime on any cabinet type: mild dish soap mixed with warm water
- For grease and odor on painted or laminate surfaces: equal parts white vinegar and warm water
- For wood cabinets: Murphy's Oil Soap diluted per label — cleans without stripping the finish
What to Avoid:
Harsh chemicals permanently damage cabinet finishes. Never use:
- Abrasive sprays or scouring pads
- Bleach-based cleaners (sodium hypochlorite)
- Ammonia-based products
- All-purpose disinfectants with quaternary ammonium compounds
These strip protective topcoats, cause discoloration, and dull surfaces permanently.
Identify Your Cabinet Material:
Once you know what to avoid, it helps to confirm what you're working with before reaching for any solution:
- Visible wood grain = natural wood or wood veneer
- Smooth, uniform color with no grain = painted MDF or laminate
How to Clean Kitchen Cabinets Step by Step
Empty and Dust First
Applying liquid to dusty cabinets creates a muddy paste that smears instead of cleans. Clear countertops below to catch drips, then remove dust thoroughly.
Use a vacuum brush attachment or dry microfiber duster to sweep cabinet fronts, top edges, corners, and hinges. Horizontal surfaces like cabinet tops collect significantly more grease-laden dust than vertical doors due to gravitational settling—so pay extra attention there.
Mix Your Cleaning Solution by Cabinet Type
Choose the right solution for your material:
- Painted or laminate cabinets — Mix a few drops of dish soap in warm water
- Wood cabinets with grease buildup — Use equal parts white vinegar and warm water
- Natural wood needing conditioning — Dilute ¼ cup Murphy's Oil Soap per gallon of warm water; increase to ½ cup for heavy cleaning
Critical rule: Wring out your microfiber cloth until it's damp, not wet. Dripping moisture damages wood finishes.
Never use undiluted vinegar on wood—it strips the protective topcoat over time.
Clean the Cabinet Surfaces
Work top to bottom in sections. Use downward strokes to lift grease without spreading it.
For stubborn, polymerized grease around handles and near the stove, make a paste of equal parts baking soda and water. Apply with a soft toothbrush using gentle circular motions, let sit 1-2 minutes, then wipe clean.
Cabinets near the stove take the heaviest hit because range hood capture efficiency varies wildly from under 15% to over 98%. Without adequate ventilation, aerosolized grease settles directly onto nearby cabinet fronts. These areas often need a second cleaning pass.
Clean the Hardware
Handles, knobs, and hinges collect the most grime but often get skipped. If removable, soak hardware in warm soapy water for 15-30 minutes, then scrub with a toothbrush. For fixed hinges, use a dampened toothbrush with your cleaning solution.
Dry hardware immediately—standing moisture causes rust on metal components, especially older or exposed hinges.
Rinse and Dry Thoroughly
Go over all cleaned surfaces with a clean cloth dampened in plain water to remove soap or vinegar residue. Residue left to dry creates a cloudy haze.
For wood cabinets, don't let moisture sit — it penetrates the finish and causes swelling, warping, or white water marks. Use a dry microfiber towel immediately after rinsing, then allow cabinets to air dry for a few minutes before polishing.
How to Polish Kitchen Cabinets for a Lasting Shine
Cleaning removes grime. Polishing creates the shine and protects the finish. It's a separate step, done only after cabinets are fully clean and dry.
Polish Options by Cabinet Type:
- Natural wood: use a commercial beeswax-based polish or a product labeled specifically for wood cabinets
- Painted or laminate: use only a polish labeled for painted or laminate surfaces
What NOT to use: Avoid oil-based polishes on painted or laminate cabinets; they cause discoloration and greasy residue. Never use silicone-based aerosol polishes like Pledge: silicone creates an almost impossible-to-remove contamination that causes "fish-eye" craters if you ever need to refinish.
DIY polish warning: While many sources recommend olive oil and vinegar mixes, wood-care experts warn that non-drying oils go rancid, smell bad, and attract dust.
Application Method:
- Test first — Apply polish to an inconspicuous area and check results
- Apply to cloth, not cabinet — Put a small amount on a clean microfiber cloth
- Buff in small circles — Work polish into the surface using slow, even circular motions
- Final buffing pass — Use the clean side of the cloth in long horizontal strokes to remove excess and reveal shine

The surface should look uniform and feel smooth, not oily or tacky. A little polish goes a long way. Over-applying leaves a sticky film that attracts dust.
Common Mistakes That Can Damage Your Cabinets
Over-Wetting
Using a soaking wet cloth across wood cabinet surfaces is the fastest way to cause finish bubbling, warping, or delamination. Always use a damp—not wet—cloth and dry the surface immediately after.
Using the Wrong Products
Cleaners containing ammonia can cause water-based finishes to "blush" or turn white. Bleach will mar, etch, and permanently discolor laminate and wood finishes. Abrasive pads and steel wool permanently scratch and dull surfaces.
Ingredients to avoid on labels:
- Sodium hypochlorite (bleach)
- Ammonia
- Quaternary ammonium compounds (quats)
- Abrasives or scouring agents
Wrong Polish for the Surface
Using furniture polish meant for a different surface type—silicone sprays on wood, or oil-based polish on painted cabinets—can seal in grime, create sticky buildup, or cause permanent discoloration.
How Often Should You Clean Your Kitchen Cabinets?
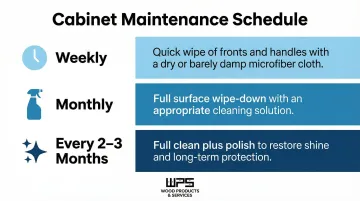
Maintenance Schedule:
- Weekly — Quick wipe of frequently touched fronts and handles with a dry or barely damp microfiber cloth
- Monthly — Full surface wipe-down with appropriate cleaning solution
- Every 2-3 months — Full clean plus polish to restore shine and protection
Preventive Habits:
- Wipe spills immediately
- Run your range hood while cooking to intercept airborne grease before it settles
- Avoid placing steam-producing appliances directly below wooden cabinet shelves
When Cleaning No Longer Works:
If polishing no longer restores appearance, the finish may be worn through. At that point, cabinets may need refinishing, refacing, or replacement.
If yours have reached that point, replacement is worth considering. Quality Made Cabinets builds custom kitchen cabinets from high-grade wood with finishes designed to last, and handles the full process from design consultation through installation. Every project comes with a 12-month workmanship guarantee and a free post-installation check.
Frequently Asked Questions
How often should I polish my kitchen cabinets?
Polishing every 2-3 months is standard, but high-use kitchens benefit from polishing every 6-8 weeks to maintain the protective layer and shine.
Can I use vinegar to clean all types of kitchen cabinets?
Diluted vinegar (1:1 with water) works well on painted and laminate cabinets for degreasing. Use it sparingly on natural wood—never full-strength—as it can break down the finish over time.
What's the best way to remove heavy grease buildup from cabinet doors?
A paste of equal parts baking soda and water applied with a soft toothbrush works well on heavy grease near the stove. Let it sit 1-2 minutes, scrub gently, and wipe clean.
Do I need to empty my cabinets before cleaning the exteriors?
Emptying isn't required for exterior cleaning. Clearing the counter below helps catch drips. Only remove doors or drawers for deep-cleaning projects or refinishing.
Is Murphy's Oil Soap safe for wood kitchen cabinets?
Yes. Murphy's Oil Soap cleans and lightly conditions wood without stripping the finish when diluted per label directions—making it a safe choice for most finished wood cabinets.
What should I do if cleaning no longer restores my cabinets' shine?
If polishing fails to restore appearance, the finish may be worn through. Cabinets may need refinishing, refacing, or replacement. A cabinet professional can assess the finish condition and walk you through refinishing or replacement options.